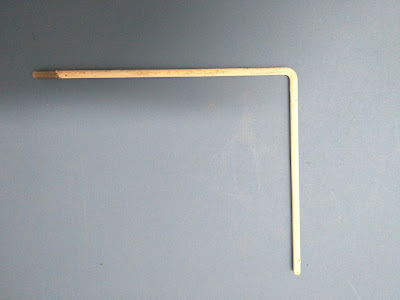
I am frequently asked what my system is for mounting my helmet collection.
First off, a little bit about my particular taste. I like my helmets to be displayed with the chinstraps fully visible, it provides an ovoid shape, which, to me, is suggestive of the face of the soldier who wore it. I also like the mounts to be as unobtrusive as possible and have the helmets seem to "float". I worked at a large public museum for seventeen years, and this technique I took with me when I left.
This nice lobstertail picklehaube is in the " H is for hats" exhibit at the Grand Rapids Public Museum in Michigan. As I watched my colleagues make the installation, I found myself fascinated with the elegant mounting system - a simple bent rod, and I copied the idea for my collection.
If you have the wall space you may find that this system is much more satisfying than using shelves.
You start with quarter-inch or three-eights inch steel rod. I buy mine at a supplier in ten-foot lengths - which is the cheapest way to buy it - but it is also available in any big home improvement store.
I hacksaw the rods into fourteen-inch lengths. To facilitate the right-angle bend I heat the metal, at the point of the bend, cherry red. With one end in the vise and a vise-grips clamped to the other end, I make my bend. I often use a square to check my work but after a few of these one develops and "eye" for the correct angle. One should wear heavy leather gloves for this, and remember that the metal stays very hot for a few minutes.
Note that the rod is about six-inches long on one side and eight on the other. The long one is the one that will be driven into the wooden 2x2 and the short end will support the helmet.
The brackets were primed and painted with two coats of semi-gloss white.
Making the 2x2 mounting strips involved using my table saw, miter saw, and drill press.

1/4" holes were drilled through the 2X2s to support the rods.
Toggle-bolts are used to mount the 2x2 wooden strips against the wall.
I cut my 2x2s about six feet in length which provides enough space for five or six helmets.
The long end of the bracket is pounded into holes 1/4" drilled into the 2x2. The fit must be tight enough to keep the bracket from turning on its axis and causing the helmet to fall. After mounting, the rod and the 2x2 will have their paint touched-up.
To distribute the weight a little more evenly on the liner, I cut four-inch length of shipping tube and fit them over the bracket. If you want to do this in a sound archival fashion you should cover the tube in unbleached muslin, or, as I do, spray them with clear acrylic, which is acid-free.
And there you have it...helmets "floating" against a well-lit wall.
I hope you find this helpful
See you next time with another cool helmet from the collection.
Mannie


2 comments:
That 'how-2' and its results and both enormously impressive. Certainly makes me wish I had the practical skills - and more importantly - the space to do the same. I would dearly love to get even a small percentage - even just the absolute favourites - on proper display. But we live in a small house where most walls are bookshelved. And it is even more difficult to find a book in boxes or heaps than it is to find a helmet (and that's increasingly difficult!) You make it all seem so simple and so desirable. Oh well.
Thanks Greg for the nice remarks on my blog post. I've had two houses as an adult, and when house hunting I specifically looked for space that would accommodate my collection without encroaching on the house proper. The house we live in now is small - just over 800 square feet - but my wife gifted me the basement Two rooms of which have helmets mounted, and a small third area for toy soldiers and model making. I'm very fortunate. This is the reason that I only have 147 helmets in my collection at any one time; That's the number that fit on my walls, and I don't like to have helmets in storage where I can't enjoy them. I feel for you and your space limitations, and believe me, I do know how lucky I am to have the space...and the wife.
Mannie
Post a Comment